8 May 2012

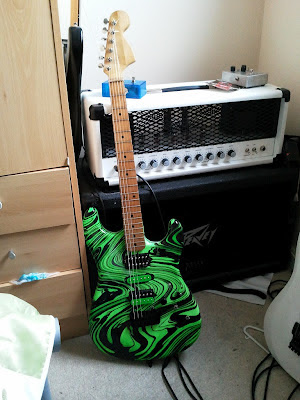
Swirley Shirley MkI

Well i've got this knocked together in a temporary state.

The neck is a temporary one that I got on ebay for £18! Complete bargain. It has a great playability and as an added bonus has a brass nut. It has had a repair behind the headstock that has been done very well and also is a 54mm heel rather than the required 55.5mm.

The bridge is also a cheapo from eBay that is surprisingly good and will do the job until the Kahler 2710 arrives.

Back onto the pickups. They are all entwistles being HVX in the bridge. The single coil is the XS62 and the neck is the HVX neck. They are all very nice they are very 80s sounding but are not quite 100% what I want as i prefer more high end presence and and a faster more precise low end.

I do have plans on trying other pickups in this guitar from both Bulldog pickups & The Creamery.

I will get some clips done for the next post regarding this when the guitar is in MKII.

Now here's a few pictures

Here's a quick shot of me playing it. you can see the gaps at the side of the neck.

This photo shows how well the clear coating turned out.

Ignore the twisted B & E strings here I had to take the neck off to adjust the truss rod and didn't realise before taking the photo.

This one shows just how amazingly vibrant the DR neons are and as a bonus they sound and feel amazing too.

29 March 2012

Let me introduce you to Swirley Shirley!

Here is a little something that I am going to be putting together over the next few months.


I got the body from Out of this swirled. I looked at it on the website for a good while and then just bought it as I noticed they are closing down and I didn't want to miss out.

This is going to be a more rock oriented guitar as my others are very metal so this will be a nice change.

Its American Red Alder and I am planning to pair it with a Kramer classic replacement neck with the beak style headstock.

The neck will be a single piece of flame maple with black dots for fret markets.

I will probably grab a set of custom Bulldogs for this also as there isn't really much else on the market that appeals to me or is good value for money.

I have also decided to load this with a Kahler trem which is going to be another new experience for me as i've strictly used hardtails & FR type trems in the past.

I am just about to pack the body up to send it off for clear coating and hopefully I will have decided on the neck spec and have it on the way by the time I get the body back.

InMadOut Transformers - Soldano Replacements.

This post is a follow on from the heavily modded SLO post which can be found here.

I had a few reasons for choosing these transformers. The main one being that I am building this amp around a dual KT88 Power section and these transformers are perfectly specced for the application.

These were made to order and had a very short lead time of around 10 days which is another fantastic reason to use these.

There was a bit of the impregnation resin on one of the endbells which I cleaned off but it also took a bit of the black paint off too so i'm possibly going to dissasemble these and spray them matte black.

The power transformer is an absolute beast!


So now all that i'm waiting on for this build is the chassis & a headshell that I am getting custom made.

Hopefully there will be more posts soon.

4 February 2012

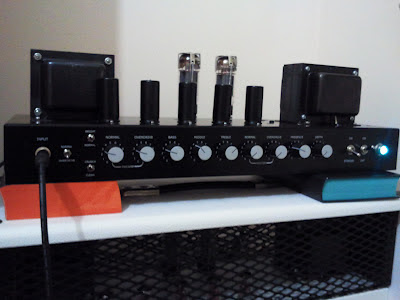
Dave's Custom Amp - None More Black! Updated: Thursday 8th March 2012

THIS AMP IS NOW FINISHED!

Well here is a little something i'm putting together for a friend of a friend!

So far all the pcbs are populated and the chassis & headshell are in which I am going to prepare for the final build steps this weekend.

The transformers should hopefully be here in the middle of next week.

The spec is as follows

50w
Sprague Orange Drops
Vishay CCF60/ Koa Speer & Panasonic Resistors
Sprague Atom, F&T, Nichicon Muse Electrolytics
Onetics Hi Def Output Transformer
Onetics Custom Power Transformer
Onetics 5H Choke
SLO style Chassis & Headshell - none more black.

And here are a few pictures of whats been done so far.

Resistors Populated Vishay CCF60 1% MF for ultra quiet operation.

Panasonic Power Resistors.

Full preamp resistor population shot.

F&T Electrolytic Capacitors added

Sprague Orange Drop 715p/225p Capacitors

Sprague Atom Electrolytic Capacitor

This one is pretty much the entire preamp populated

Power amp Using Nichicon Muse Series Electrolytics & UF5408 Diodes

Vactec VTL5C1 Optocouplers for Silent & Instantaneous channel switching

Recton DB101 Bridge Rectifier for the channel switching voltage rectification

The Headshell when it arrived

This headshell needs a little adjustment. The front grill sits about 11mm too far forward.


And that is all for now. I shall update this post as and when things happen which should be a fair amount over the coming week.

Update: Sunday 19th February
I started work drilling the chassis today should hopefully get the amp finished by the end of the week.

This one is a fairly boring update as not much went on as this part takes quite some time as I countersunk the holes by hand as I find it a lot easier to do it accurately this way.

The reason for countersinking all the board mounting holes is so that the transformers can sit flush against the chassis.

Transformer Drilling #1

Transformer Drilling #2


Update: Friday 24th February
I managed to get a good amount done today, the amp is mainly wired up im just waiting on the preamp & power amp valve sockets as the ones I had didn't quite fit the chassis or they were the wrong pin orientation for how I wanted to do the wiring.

All that's left to do now is wire up all the heaters/valve sockets and wiring the actual circuitry in.

The Pot Shot!

Faux Center Tap

Lamp Wiring #1

Lamp Wiring Close Up #1

Lamp Wiring Close Up #2

Clean/Crunch & Bright Switch Wiring. This part needs redoing.

Pot Wiring

 Transformers Mounted

Clean/ Crunch, Bright & Channel Switches

Power, Standby Switches & Lamp

Onetics Power Transformer Hookup Schematic 

Power Amp Wiring


Preamp Wiring #1

Preamp Wiring #2 In this photo you can also see a wire joining to the preamp PCB mounting post this is coming from an RF cap that is just an extra measure that I was made aware of by my co blogger Bob that just stops those annoying radio frequencies that can sometimes be picked up by guitar cables.

Pot Wiring & Effects Loop
 

Test Run #1

Final Assembly 

 Front Right. You can see in this picture that the front panel now perfectly lines up with the front of the chassis.

Rear Right 

Signature 


This one is just for the sake of it really. These two amps are practically the same circuit wise the main differences being mine (the white one) is running on JJ E34L and Daves is running on JJ 6l6GC so it's kinda the evil twin scenario!


And here is the final shot of the amp in my posession where it went through around 8 hours of constant play testing at a range of volumes (which my gerbils weren't too happy about when it got higher)
 

Dave is coming to pick up the amp this evening after a 6 hour tattooing session and is extremely excited.


2 January 2012

Custom Overdrive - My own personal pedal

Well this is something that i've been meaning to do for myself for a little while but haven't really gotten around to due to various reasons.

It also worked out quite well as an experiment in labelling enclosures which turned out far better than I expected it would for the first real attempt.


The pedal itself is the same pedal that I made for Ole which was a one off custom order that I was so pleased with that I just had to make one for myself.

The circuit takes a fair amount of influence from the Fulltone OCD V3 and the Maxon OD808. The 'Cut' switch isn't the HP/LP switch like on the OCD rather it removes the low end below 100hz cleaning up the sound more and helping the guitar cut through easier.

25 December 2011

Modded High Gain Soldano Style Preamp Complete

This is just a very quick update which also ties in with my new soldering iron that I got as a christmas present.

So first things first here is the new iron. It's a pretty simple 48w temperature controlled soldering iron that goes up to 430°C in 1 or 10° steps.
Now as for the amplifier heres the progress that i've made so far.

It's been populated with Vishay CCF60 high temp low tolerance resistors. These are ideal for this kind of circuit as they have a 1% tolerance and are a metal film type so they really help keep the noise floor in high gain circuits down. Also note the Panasonic power resistors, this is my first time using these but they were spec'd right and were a better price than the Xicons that I have used in the past that were on backorder.

The coupling capacitors are Mallory 150 series polyester film capacitors. These are very high quality and are a perfect balance between all that vintage mojo you hear about from the traditional mustard caps and also the clarity and edge of the Sprague Orange Drops.


The electrolytics are a mixture of Sprague Atoms & F&T axials. These are all very well spec'd and are a perfect match for the SLO circuit.


I shall be starting on the poweramp tomorrow hopefully and will also give a breakdown of that.

Merry christmas to all and if I don't post again before then I hope you have a great new year.

24 December 2011

Little Angel Chorus Build Log Part 2

I have finished populating the board using Hitano electrolytics, panasonic box film caps and one ceramic disc cap.

I chose the film caps as they provide a very clean and smooth sound which is exactly what I am aiming for with this chorus as I want it to be thick & lush. The electrolytic choice of Hitano's is my usual go to cap for pedals as they are have a very low leakage, quiet and very high quality.

The ceramic cap wasn't planned originally as they can sometimes be a bit harsh and work best in overdrive & distortion circuits but the film cap I had didn't fit the hole spacing on the board.


18 December 2011

Heavily Modified New SloClone Build

Well this started out as something else but has quickly taken a different direction due to a request.

The plan so far is to use Mallory 150 series for coupling/decoupling alongside F&T & Sprague electrolytics in the preamp with Nichicon & United Chemi Con Electrolytics in the power amp.

Voicing wise this is going to be a bit of a departure from the stock SLO voicing in that it's going to have an overall tighter feel with a fair bit of grit & grindiness in the midrange and I also plan on making the gain a but more aggressive also.

I've ordered all the electronics & hardware in and i'm discussing the chassis & headshell cosmetics currently.

Here is a picture of the SmashGuitars PCB's that I will be using in this build.


I shall update the blog with more info on this as the project progresses.

17 December 2011

Little Angel Chorus Build Log Part 1

Well I have been saying I would do this for some time now but mundane day to day things such as work, fire & floods have been getting in the way.

I was going to do it in a completely step by step fashion but decided that would be boring and take up about 100+ posts. So instead I have split it into sections.

Here we have the board populated completely with all the resistors and the opamp sockets for the NE5532 and the PT2399.

In the image that I have uploaded it shows that one resistor is mounted upright due to space requirements on the PCB making it so that it couldn't be flush with the board. I generally solder resistors that have to be mounted like this last as I populate the PCBs in component size order as this makes it far easier in the long run.


With this I am presuming that you know how to solder but if not I am planning a future pedal that has a smaller component count that I will do an entirely step by step guide.


I'm hoping that tomorrow I will have some time to do the capacitors which I will go into more depth on as there is some thought to be put into this stage as they have a bigger impact upon the final sound.

Also note I may also be posting the layout for this pedal once I get permission from the designer and may venture into offering BYOC style kits if their is enough interest.

16 December 2011

Blog Update

Hey guys this is just a quick post to let everyone know that I am still keeping up on this.

I have just been completely snowed under at work with christmas commitment & whatnot that I haven't really had much time to do anything for myself.

This weekend i'm finally going to have some time to myself and I received my Little Angel Chorus PCB's so am going to get this thing put together with a "semi" tutorial hopefully.

here's a picture too to show the excellent work done by Frequency Central who designed this circuit.